First of, a BIG thank you to my friend Luca Ferrarotti who inspired, actively contributed and helped me with this HowTo.
Then, something I wanted to write since a very long time. Other articles in this blog instruct about how to use OS X or iOS to build a native client to site IPSec VPN terminated on McAfee (formerly Stonesoft) Next Generation Firewall. Since I joined Stonesoft many years ago, lots of people enquired me and Support and my SE colleagues about how to build this configuration… here you are. Your voice has been listened!
I wrote this article using McAfee Next Generation Firewall version 5.5.6 and McAfee Security Management Center 5.7.0, while on client side I am on Ubuntu 12.04.4 LTS.
Let’s start from client side by installing a free (for Linux) IPSec VPN Client: Shrew Soft. Because no standard Ubuntu package seems to exist at the time of this writing, let’s compile it.
- download the package from the web using command: wget https://www.shrew.net/download/ike/ike-2.2.1-release.tgz
- extract the packet into a directory of your choice. I’ll just use “ike”. Type the command:
sudo tar xzvf ike-2.2.1-release.tgz ; cd ike - to successfully compile this package you need to ensure you have the right components installed on the system, which are checkinstall, cmake, libedit, libssl-dev and qt4. Install them with the command:
apt-get install cmake libqt4-core libqt4-dev libqt4-gui libedit-dev libssl-dev checkinstall
this command will install only the relevant packages in case you already have some of them - compile and install the software using the command:
cmake -DCMAKE_INSTALL_PREFIX=/usr -DQTGUI=YES -DETCDIR=/etc -DNATT=YES
The ouput should be similar to the following:-- The C compiler identification is GNU -- The CXX compiler identification is GNU -- Check for working C compiler: /usr/bin/gcc -- Check for working C compiler: /usr/bin/gcc -- works -- Detecting C compiler ABI info -- Detecting C compiler ABI info - done -- Check for working CXX compiler: /usr/bin/c++ -- Check for working CXX compiler: /usr/bin/c++ -- works -- Detecting CXX compiler ABI info -- Detecting CXX compiler ABI info - done -- Using install prefix /usr ... -- Using etc install path /etc ... -- Using bin install path /usr/bin ... -- Using sbin install path /usr/sbin ... -- Using lib install path /usr/lib ... -- Using man install path /usr/local/man ... -- Looking for crypt in crypt -- Looking for crypt in crypt - found -- Looking for include files CMAKE_HAVE_PTHREAD_H -- Looking for include files CMAKE_HAVE_PTHREAD_H - found -- Looking for pthread_create in pthreads -- Looking for pthread_create in pthreads - not found -- Looking for pthread_create in pthread -- Looking for pthread_create in pthread - found -- Found Threads: TRUE -- Using library -lpthread -- Looking for pthread_mutex_timedlock in -lpthread -- Looking for pthread_mutex_timedlock in -lpthread - found -- Using binary /usr/bin/flex ... -- Using binary /usr/bin/bison ... -- Performing Test NATT_FOUND -- Performing Test NATT_FOUND - Success -- Enabled NAT Traversal support ... -- Looking for Q_WS_X11 -- Looking for Q_WS_X11 - found -- Looking for Q_WS_WIN -- Looking for Q_WS_WIN - not found. -- Looking for Q_WS_QWS -- Looking for Q_WS_QWS - not found. -- Looking for Q_WS_MAC -- Looking for Q_WS_MAC - not found. -- Found Qt4: /usr/bin/qmake (found version "4.8.1") -- Enabled Client QT GUI support ... -- Configuring done -- Generating done -- Build files have been written to: /root/Desktop/ike
- use checkinstall install the application. Checkinstall is a special command that will install the application keeping track of the installed files. As part of the process it will also create a .deb package. Use the command:
sudo checkinstall -y
It will produce extensive logs and will conclude with a meaningful:********************************************************************** Done. The new package has been installed and saved to /root/Desktop/ike/ike_20140401-1_i386.deb You can remove it from your system anytime using: dpkg -r ike **********************************************************************
- create a valid config file starting from the sample one with the command: sudo cp /etc/iked.conf.sample /etc/iked.conf
Congratulations, you’re ready to start the most exciting part: configuration and test 
Let’s launch the IPSec daemon with the command: sudo iked
This will produce an output like the one reported below:
root@testbox:~/Desktop/ike# sudo iked
ii : created ike socket 0.0.0.0:500
ii : created natt socket 0.0.0.0:4500
## : IKE Daemon, ver 2.2.1
## : Copyright 2013 Shrew Soft Inc.
## : This product linked OpenSSL 1.0.1 14 Mar 2012
We can now access the graphical interface using the command: qikea
The following window appears:
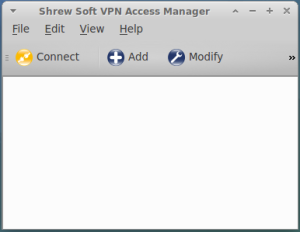
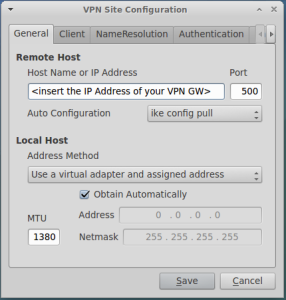
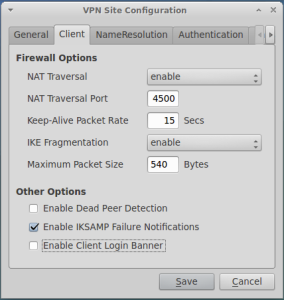
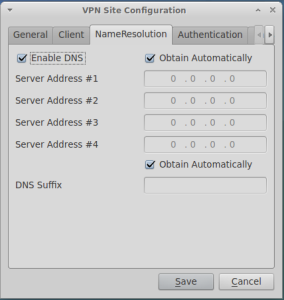
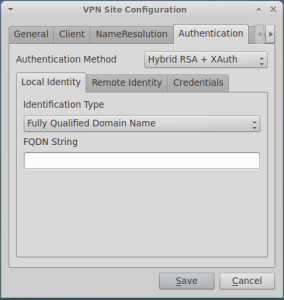
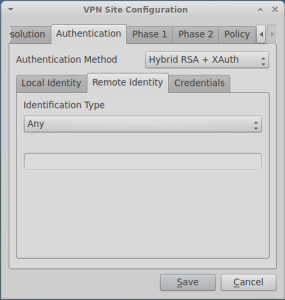
Click on Add and fill the screens as shown below:
The tab authentication is almost all defaults, except for the credentials tab where you have to load the public certificate of the CA which issued your VPN Gateway certificate:
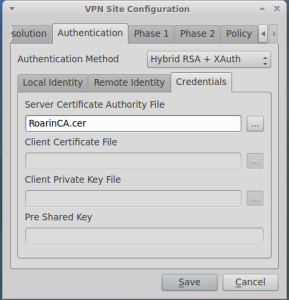
For additional details about how to create CA and optionally client digital certificates, please refer to my post about this.
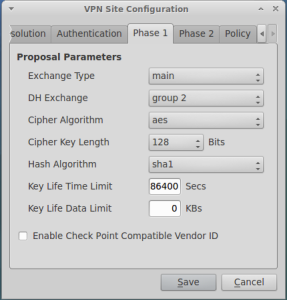
The settings for Phase I and Phase II should match what is configured in your VPN gateway:
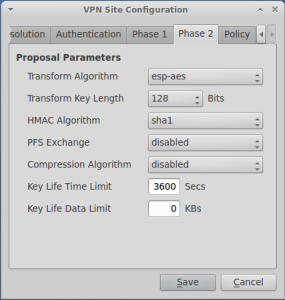
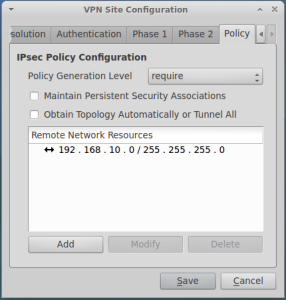
In the last tab, you need to specify the IP addresses range of the protection. Again, this setting should match what configured at VPN gateway.
That’s pretty much it.
To configure the gateway side, and if you want to implement a strong authentication system based on SecurePASS, please refer to my previous post about this.
Enjoy, and don’t forget to share the love using comments